Notifications
In the notifications section, you can configure any properties you need to send emails and messages via Telegram. These messaging services are used in the Events section.
Outgoing server SMTP

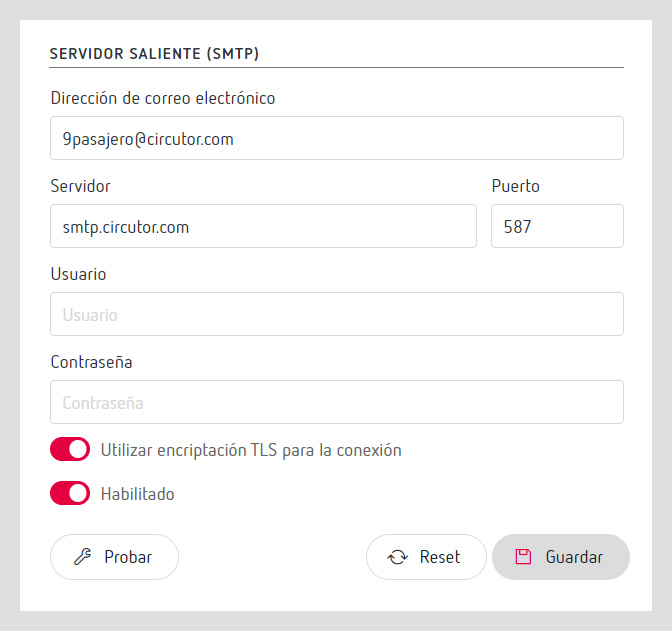
In the “Outgoing server (SMTP)” subsection, you can configure all the aspects needed to send emails:
- Email address: This is the email address of the sender.
- Server and port: Configuration of communication with the sending SMTP server, such as smtp.outlook365.com, and port 587 for Outlook's SMTP server.
- Username and password: The connection credentials for the SMTP sending the emails.
- Use TLS encryption for the connection: Marking this option is necessary if the SMTP server allows for the use of this type of encryption.
- Activated: This allows the sending of emails to be activated or deactivated. This option is useful if you want to deactivate the sending of emails configured in Events at a given time.
If you want to check the configuration of the sending of emails before activating it, you can click on the “Test” button.
Once you have modified the information to fit your preferences, click on the “Save” button to apply the changes. If at some point you decide to go back to previously configured values while you are making modifications, click on the “Reset” button.
Telegram

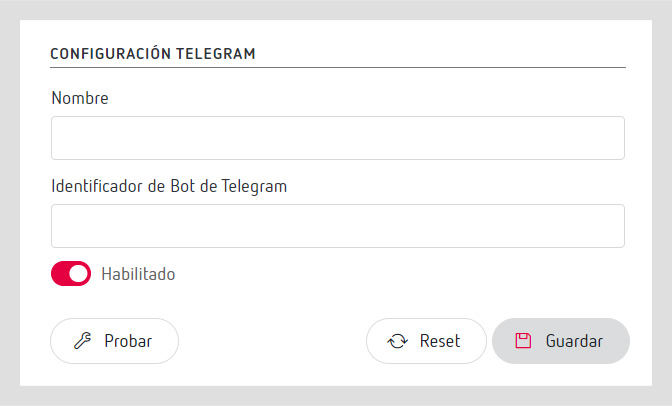
In the “Telegram Configuration” subsection, you can adjust the following:
- Name: The name of the Telegram Bot.
- Telegram Bot identifier: This identifier will be used internally with Telegram's API to send specific messages.
- Activated: Activate or deactivate the sending of emails via Telegram. This option is useful if, for example, you want to temporarily disable the sending of Telegram messages configured in Events.
If you want to make a test of the configuration before activating it, you can click on the “Test” button.
After adjusting the information you want, click on the “Save” button to apply the changes. If you decide to go back to the values previously configured at some point during the modification, click on the “Reset” button.
Configuration for sending messages on Telegram
Steps to follow to obtain the configuration credentials for sending messages on Telegram:
Create the Telegram Bot and get your botId
- Enter the navigator and visit https://web.telegram.org/a/
- Use the Telegram application on your mobile device. Go do Settings > Devices and choose "Link a device".
- Scan the QR code you got from the browser.
- Enter the navigator and visithttps://telegram.me/botfather
- In “BotFather”, create a new bot using the command “/newbot”. Enter the name of the bot, such as, BOT_NAME, and assign the name of the user for the bot, ending in “_bot”, such as “bot_name_bot”.
- To see all the bots created, use the “/mybots” command in botFather. To get the bot token from the list of bots shown, you have to enter your bot and click on the “API Token” option.
- To access the bot created, go to the URL t.me/bot_username, where bot_username may be, for example, bot_name_bot (t.me/bot_name_bot).
- To launch the bot, click on the “Start” button in the bot's own chat.
- There are three possible recipients of Telegram messages: a user, a group or a channel.
- To get the identifier of the user, search for the user @userinfobot. Enter the bot's chat and click on “Start”. Your user’s identifier should appear, which will be the identifier of the recipient.
Create a Telegram channel to send messages with the bot
- It is impossible to create a channel directly from Telegram Web.
- Use the mobile/PC application to add the bot to the channel as administrator with permission to send messages.
- Use the desktop application to facilitate the creation of the channel. Assign the channel a name (such as PSS_Channel) and temporarily configure it as public to get the "channel_id" later.
- To add the bot to the channel, go to the telephone application and add it to the channel.
- Once the channel is created, send a message to the channel using the browser with the following URL.
https://api.telegram.org/bot<API_TOKEN>/sendMessage?chat_id=@powerstudiotest&text=TEST
Where API_Token is the identifier of the bot and “powerstudiotest” is the name of the channel
- The response should return a *200* code and a JSON****
- Take note of the “id” camp within “chat”. This value is the “chat_id” of the request.
- Optionally, make the channel private again.
Now you have the bot_id and the chat_id needed to send messages to Telegram using the API.
Note
If you want to create a group in Telegram Web, the steps are the same as for creating a channel.